Understanding React Virtual DOM

React is javascript library to build UI application. React is popular and used by many organisations for the development.

Why React is Famous

React is famous because of many features like virtual DOM, routing, lightweight library, modular development and many more. Today we will see virtual DOM topic and this makes react a unique library.

Virtual Document Object Model (DOM)

The Document Object Model (DOM) is a structure of an HTML . Every node is the tree is an element.

When an user action triggers the event, an event updates DOM , now to display correct HTML , DOM needs to do some calculation called as reconciliation . Such operations are performance heavy and applications performance becomes lousy.

Virtual DOM is copy of DOM , which is first updated and the compared against the DOM and only that part is updated which needs to be updated.

As you can see in the below diagram , when action is triggered in the App, Virtual DOM is changed.

Now in second step, Virtual DOM does the reconciliation first and checks the difference with real DOM , and updates the DOM instead of doing direct updates to DOM and only changed part is updated and not entire DOM

Benefits

  • Performance efficient
  • Consistent programming interface across browsers.
  • Only Delta is updated against Full DOM.

Verify if only updated part is re-rendered

Below code is javascript file out of entire project. Entire project setup can be found here at github.

console.log("---loading script js ----");

const jsContainer = document.getElementById('jscontainer');

const reactContainer = document.getElementById('reactContainer');

const render = () => {


  jsContainer.innerHTML = `
    <div class="demo">
        Hello Javascript
        <Input/>
        <p>${new Date()}</p>
     </div>
`;

  //note the difference , in native JS we use strings and in React we use //Objects


  ReactDOM.render(
    React.createElement(
      "div", {
        className: "demo"
      },
      "Hello React",
      React.createElement("input"),
      React.createElement("p", null, new Date().toString())
    ),
    reactContainer
  );
}

setInterval(render, 1000);
console.log("completed");

As you can see, we have created a Date element and rendered forcefully every 1 second. One is normal HTML and other is using react. In Normal HTML we have string (innerHTML) and in React we have objects. Now these objects are important in reconciliation and virtual DOM updates.

The below image explains the behaviour of delta updates. You can also see video but in case you tube is blocked you can see the images descriptions.

Video showcase for delta updates

Conclusion

  • Virtual DOM is key differentiator in react
  • Virtual DOM is performance efficient
  • It updates only delta part in DOM
  • It helps to achieve great UX in Single Page Application.

Spring Boot – Actuators

What is Actuator

These are inbuilt spring boot features to gather metrics, info about traffic, monitor application and some custom checks like Database checks.

Best part is – this comes built in and you just need to configure it in your application and displays most of the information out of the box with possibility to extend in multiple ways.

It uses either HTTP or JXM to interact.

Enable Actuator

To initialise spring boot projects there are several ways but easy way is to use spring Initializr. You can click here to find out more and as mentioned in below screenshot select the two dependencies.

Understanding Maven Dependencies.

<?xml version="1.0" encoding="UTF-8"?>
<project xmlns="http://maven.apache.org/POM/4.0.0" xmlns:xsi="http://www.w3.org/2001/XMLSchema-instance"
	xsi:schemaLocation="http://maven.apache.org/POM/4.0.0 https://maven.apache.org/xsd/maven-4.0.0.xsd">
	<modelVersion>4.0.0</modelVersion>
	<parent>
		<groupId>org.springframework.boot</groupId>
		<artifactId>spring-boot-starter-parent</artifactId>
		<version>3.1.1</version>
		<relativePath/> <!-- lookup parent from repository -->
	</parent>
	<groupId>com.bank</groupId>
	<artifactId>actuator-demo</artifactId>
	<version>0.0.1-SNAPSHOT</version>
	<name>actuator-demo</name>
	<description>Actuator Demo project for Spring Boot</description>
	<properties>
		<java.version>17</java.version>
	</properties>
	<dependencies>
		<dependency>
			<groupId>org.springframework.boot</groupId>
			<artifactId>spring-boot-starter-actuator</artifactId>
		</dependency>
		<dependency>
			<groupId>org.springframework.boot</groupId>
			<artifactId>spring-boot-starter-web</artifactId>
		</dependency>

		<dependency>
			<groupId>org.springframework.boot</groupId>
			<artifactId>spring-boot-starter-test</artifactId>
			<scope>test</scope>
		</dependency>
	</dependencies>

	<build>
		<plugins>
			<plugin>
				<groupId>org.springframework.boot</groupId>
				<artifactId>spring-boot-maven-plugin</artifactId>
			</plugin>
		</plugins>
	</build>

</project>

Spring boot when finds the dependencies on classpath then it automatically configures all the endpoint for actuator. <artifactId>spring-boot-starter-actuator</artifactId> this artifact does the entire setup .

Setting up the project.

Simply build the project using mvn clean install and then mvn spring-boot:run to start the project.

By default application should run on 8080 port.

If you hit this url – http://localhost:8080/actuator in your browser you will see following response.

{"_links":{"self":{"href":"http://localhost:8080/actuator","templated":false},"health-path":{"href":"http://localhost:8080/actuator/health/{*path}","templated":true},"health":{"href":"http://localhost:8080/actuator/health","templated":false}}}

Check Application Health.

To check the application health you can invoke http://localhost:8080/actuator/health and you can see following response. UP means application health is OK and running fine.

{"status":"UP"}


Enable other modules.

We have earlier mentioned that there are many actuator endpoints but we do not see them by default because those are disabled by default and we need to enable them.

There are two ways to enable them as follow.

  1. management.endpoint.[actuator-id].enabled like management.endpoint.sessions.enabled=true
  2. Include all IDs to be enables like management.endpoints.web.exposure.include=metrics,sessions

Once you enable this in application properties file then you can see the response.

management.endpoints.web.exposure.include=metrics,sessions

then hit http://localhost:8080/actuator/metrics is browser, you will see below response.

You have also possibility to exclude the modules which you don’t want.

Let’s try to see all the actuators available which are available on official spring documentation here.

All the files for the projects are stored on github here.

Conclusion

In today’s development practices and microservices world , it is highly important to have all the possible information about services to take decisions like whether to call service if it’s health is not good and many more .

Happy learning.

Postgres file loading using Ansible

A common task in project is to load file into database tables such as daily authorization file , client profiling data etc.

Another important aspect of file loading is schedular. There are many tools like autosys in market for scheduling but we will try to explore open source projects/tools to achieve.

Workflow

Let’s try to understand the workflow and steps involved in the data load process .

As mentioned in above diagram , we can use the ansible playbook with following tasks

  • Check if file is not empty
  • Load file
  • Schedule job using cron expression

Ansible Tasks

  1. Check if file exists – we can use the stats module from ansible and register in the variable. This we have seen in our ansible beginner blog as well here.
  2. Delete table contents – delete the existing rows in the table using command ansible module . i.e execute psql command .
  3. Load file into Table – please note that we use command module again with Postgres COPY command only if file is valid. You can check when condition below for the same.
  4. Scheduling of the job – you can use cron module from ansible to schedule the job.

Pre-requisite

  1. Postgres installed , up and running
  2. Ansible installed
  3. IDE with YAML support
  4. users table created within schema
  5. Test Data – you can get it from here.

Undetstanding Ansible Playbook

---
- name: Data loading in postgres DB using ansible
  hosts: localhost
  vars:
    db: mahesh
    table: wealthmanagement.users
    file: /Users/mahesh/Dev/ansible-examples/postgres-file-loading/sample-users.csv
  
  tasks:
    - name: Check if file available 
      stat:
        path: "{{ file }}"
      register: file_details
      delegate_to: localhost

    - name: Delete all the rows of table before we load it.
      command: psql -h localhost -U "{{db}}" -d "{{db}}" -c "DELETE FROM "{{table}}" ;"
      delegate_to: localhost

    - name: Loading csv file into PG DB using psql copy
      command: psql -h localhost -U "{{db}}" -d "{{db}}" -c "\copy "{{table}}" FROM "{{ file }}" DELIMITER ';' CSV HEADER";
      delegate_to: localhost
      when: file_details.stat.exists and file_details.stat.size > 0

    - name: Schedule CRON JOB for every hour
      cron:
        name: Loading csv file into PG DB 
        minute: "0"
        hour: "*"
        job: "ansible-playbook /Users/mahesh/Dev/ansible-examples/postgres-file-loading/file-loading-in-postgres.yaml"

  • As you can see we have used ansible modules and got the file loaded inside postgres DB.

VERIFICATION

  • File loading – In the below screenshot you can see the data loaded from csv file.

  • Cron Job – In the below screenshot you can see the cron job has been scheduled successfully.

You can perform many validations like max rows etc before loading and also use some notification mechanism .

Conclusion

This is very common task that every project needs in their project and Ansible is great automation tool for deployments, provisioning etc.

You can find the project code here on github repo.

Happy Learning.

Javascript IIFE (Immediately Invoked Function Expressions)

What is IIFE

Immediately invoked function expression (IIFE) is a function as expression which is executed immediately after creation. Wikipedia reference – here . The IIFE name is given by Ben Alman in his blog.

Why we need IIFE

  • Javascript variables when created are by default assigned to global namespace when not in blocks/function
function merge(firstArgument, secondArgument){
	return firstArgument + secondArgument;
}

if you define such function then it is by default assigned to global namespace i.e window in case of browser. Let’s check the output.

As you can see when we call window.merge it works as expected and this is same for variables defined outside functions. Those are also attached to global state.

Now this has some problems

  1. Too many global variables and functions results in inefficient memory management.
  2. Name collision .

One way of solving this issue is using IIFE feature. Let’s take a look .

Syntax

The common syntax is as below but note that arrow function or function with variable names as works.

(function(){ /Your code goes here... })();

Now let's convert our code to IIFE .
(function merge(firstArgument, secondArgument){
	console.log(firstArgument + secondArgument);
})('Wealth Management', 'Investment Banking');

Wealth ManagementInvestment Banking

With this way you can achieve memory management and also avoid collision of functions and variables names in global scope.

To cross verify we can try calling window.merge function and let’s see if we can get it for selection.

As you can see the function is not available at global state.

Conclusion

If you want to reduce memory footprints and avoid global state traffic then use IIFE feature.

Happy Learning !

ECMAScript 2023

ECMAScript is language specification developed by Ecma International. It’s international standard for scripting languages like JavaScript(JS).

It provides certain rules and guidances for syntax, behaviour etc like any other programming language (sql etc).

Javascript is not only limited to browsers but also to backed systems like node js and reactive native for mobile apps.

ECMAScript now early releases the features and let’s take a closer look at 2023 release.

Official Website https://tc39.es/ecma262/2023/

Announcement on June 27 , 2023 as below from official ECMAScript page.

Features :

Following methods on Array.prototype

  • toSorted
  • toReversed
  • with
  • findLast
  • findLastIndex 

Now let’s take a look at each of these methods.

  • Array.prototype.toSorted()

The toSorted()returns a new array with the elements sorted in ascending order.

As you can see below output is sorted in natural order.

const regions = ["Europe", "APAC", "BeneLux", "USA", "DACH", "ROE"];
const sortedValues = regions.toSorted();
console.log("SORTED -- ",sortedValues); 
console.log("INPUT-----",regions); 

SORTED --  (6) ['APAC', 'BeneLux', 'DACH', 'Europe', 'ROE', 'USA']
INPUT----- (6) ['Europe', 'APAC', 'BeneLux', 'USA', 'DACH', 'ROE']
  • Array.prototype.toReversed()

The toReversed() returns a new array with the elements in reversed order.(As name suggests).

const regionsForReversal = ["Europe", "APAC", "BeneLux", "USA", "DACH", "ROE"];

console.log(Array.prototype.toReversed.call(regionsForReversal));
 (6) ['ROE', 'DACH', 'USA', 'BeneLux', 'APAC', 'Europe']

  • Array.prototype.findLast()

The findLast()will provide first matching value in reverse order. Let’s take a look at an example.

const regionsForFindLast = ["Europe", "APAC", "BeneLux", "USA", "DACH", "ROE"];

const countryWithThreeLetters = regionsForFindLast.findLast((element) => element.length === 3);

console.log("countryWithThreeLetters", countryWithThreeLetters);
countryWithThreeLetters ROE

You can find all the examples related to this blog here at github.

Conclusion

It’s highly recommended to read recent trends in any technology as some features might help you to solve your problems which you are trying to solve using your own way or libraries.

Java 17 Features

Java 17 support LTS (Long Term Support). Majority of organisations will use java 17 as next upgrade considering LTS in mind.

You can find all the announcements on official oracle site here or on open JDK website here.

Since java is releasing features every six months, some features are in preview mode like in java 17, switch expressions is in preview mode, means we need to inform compiler to allow preview features for use otherwise it will fail during build.

Major two features are scaled classes and patterns matching for switch case expressions. In this blog we will take a look at switch case.

Prerequisite

  • IDE
  • JDK 17 installed (verify using java -version)
  • Apache Maven 3.9.2 

Project Setup

As we discussed above, we need to inform compiler to allow usage of preview features . you can use below code in pom.xml in maven based projects or you have possibility to pass argument during javac compiler process.

<build>
    <plugins>
        <plugin>
            <groupId>org.apache.maven.plugins</groupId>
            <artifactId>maven-compiler-plugin</artifactId>
            <configuration>
                <source>17</source>
                <target>17</target>
                <compilerArgs>
                    --enable-preview
                </compilerArgs>
            </configuration>
        </plugin>
    </plugins>
</build>

Now we will write a code for switch statement using java 17 and prior to java 17, results should be same but ease of coding is different in both ways 😊.

package com.taggy;
import java.math.BigDecimal;

public class SwitchStatement {

    public static void main(String[] args) {
            System.out.println("Trying out new features");
            
            System.out.println("Strings");
           
            System.out.println(getBigDecimalPrior17("100"));
            System.out.println(getBigDecimalin17("100"));

            System.out.println("Double");
            System.out.println(getBigDecimalPrior17(100d));
            System.out.println(getBigDecimalin17(100d));

            System.out.println("BigDecimal");
            System.out.println(getBigDecimalPrior17(BigDecimal.ONE));
            System.out.println(getBigDecimalin17(BigDecimal.ONE));

            System.out.println("Integer");
            System.out.println(getBigDecimalPrior17(10));
            System.out.println(getBigDecimalin17(10));
    }

    static BigDecimal getBigDecimalPrior17(Object o) {
        BigDecimal output;

        if (o instanceof String) {
            output = new BigDecimal(((String) o));
        } else if (o instanceof Double ) {
           output = new BigDecimal(((double) o));
        } else if (o instanceof BigDecimal) {
            output = ((BigDecimal) o);
        } else {
            output = BigDecimal.ZERO;
        }

        return output;
    }

    static BigDecimal getBigDecimalin17(Object o) {
        return switch (o) {
            case String string -> new BigDecimal(string);
            case Double object -> new BigDecimal(object.doubleValue());
            case BigDecimal object -> object;
            default -> BigDecimal.ZERO;
        };
    }
}

As you can see getBigDecimalin17 method has switch statement with pattern matching as well as using arrow operator instead of return keyword or break keyword.

Prior to this feature we had to use if else and the instance of operator for each check as mentioned in above code getBigDecimalPrior17 method.

If you run the program , you will get the same results using both the methods as mentioned below.

Trying out new features
Strings
100
100
Double
100
100
BigDecimal
1
1
Integer
0
0

You can find the code for this program at github .

Conclusion

Since Java features are changing frequently compared till java 9 , it’s worth checking and trying out new feature to adapt to new features in current project or tech stack.

Creation of PostgreSQL Schema with Ansible Playbooks

In this article we will use ansible automation to create schema for postgres database.

We will use all the described aspects of ansible automation which we have seen in first blog.

Prerequisites

  • Postgres DB
  • Ansible Installation
  • Python installation
  • IDE (Any of your choice) with YAML support.

Understanding Modules

As we have seen in first blog, ansible works with pre-defined modules like command etc. Now we need to create a schema in postgres database so we need to find those required modules.

You can find all the module list here on ansible site.

We have two primary tasks and hence we need following modules.

ModuleDescription
postgresql_queryRun PostgreSQL queries
postgresql_userAdd or remove a user (role) from a PostgreSQL server instance

Understanding variables

Ansible has features of variables like any other programming languages where you can define variables and use them at multiple places.

Let’s see how to define and use them in playbook.

Understanding Paybook

---
- name: postgres schema creation using ansible
  hosts: localhost
  vars:
    db: mahesh
    schema: wealthmanagement
    user: wealthmanagement_cloud
    password: do_not_share

  tasks:
  
    - name: Provision Schema
      postgresql_query:
        db: "{{ db }}"
        login_host: localhost
        login_user: mahesh
        query: "CREATE SCHEMA {{ schema }}"
      become: true

    - name: Set credentials for user
      postgresql_user:
        db: "{{ db }}"
        login_host: localhost
        login_user: mahesh
        name: "{{ user }}"
        password: "{{ password }}"
        encrypted: true
        priv: ALL
        role_attr_flags: NOSUPERUSER,NOCREATEDB
      become: true

  • We need to define variables like which database we need to use , which user and what is shema name we need to create. like
vars:
    db: mahesh
    schema: wealthmanagement
    user: wealthmanagement_cloud
    password: do_not_share
  • Now we need to create schema and we express it in an query , please note here we are going to use already defined varibles.
  - name: Provision Schema
      postgresql_query:
        db: "{{ db }}"
        login_host: localhost
        login_user: mahesh
        query: "CREATE SCHEMA {{ schema }}"
      become: true
  • Now check the schema list before we run the ansible playbook. We don’t see wealthmanagement schema

  • Running Playbook We need to run playbook with -K parameter to pass become password. Meaning we have mentined become = true in playbook which instructs ansible to become other user other than root. It will prompt for password as mentioned below.
mahesh@maheshs-mbp Dev % ansible-playbook schema-creation.yaml -K
BECOME password: 
[WARNING]: No inventory was parsed, only implicit localhost is available
[WARNING]: provided hosts list is empty, only localhost is available. Note that the implicit localhost does not match 'all'
  • Let’s check the Database if Schema has been created. As you can see wealthmanagement schema has been created.

  • As you can see schema has been has created. Similarly you can use extend this to create tables or other objects etc.
  • You can find the code and additional information here at github code.

Conclusion

  • Ansible helps you to create immutable, programmable schema creation in postgres using ansibleto automate your infrastructure provision needs including application deployment etc.

Ansible – Beginner

From last few years, Infrastructure as a code (IaC) is emerging and important topic in IT.

This concept is similar as everything as a code where we try to keep infrastructure provisioning in the code.

This allows you to have infrastructure

  • Modular
  • Idempotent
  • Declarative
  • Programmable

There are many popular Iac tools like ansible , terraform , Azure Resource Manager.

Ansible , terraform are platform agnostic meaning you can write code and run against any environment.

Benefits of Ansible

  1. Agentless – Ansible uses client server architecture meaning the configuration that you want to run on target machine is completed from remote server . This is biggest differentiating factor as imagine you have to provision some software on 1000 machines then you don’t have to install agent on this 1000 machines but ansible server logs into this machine using ssh/rdp protocol.
  2. Idempotent – meaning you need to tell ansible the desired state that you want like “server started” then ansible takes the decision whether to run that task again or not to achieve the desired state.
  3. Programmable – Ansible has playbooks defined in well known YAML format and you can program the infrastructure provision.

Let’s take a look at simple program in ansible to print logged in user.

---
- name: Ping localhost machine
  hosts: localhost
  gather_facts: true

  tasks:
    - name: Perform Ping
      ping:

    - name: Debug Message
      debug:
        msg: "Hello world from ansible world"

    - name: Get Username
      command: whoami
      register: result

    - name: Print Username 
      debug:  
        var: result.stdout
    
    - name: Debug Message
      debug:
        msg: "Hello world from ansible world {{result.stdout}}"

    - name: Debug Message using ansible variables
      debug:
        msg: "{{ lookup('env', 'HOME', default='nobody') }} is the user home directory."

You can run above run using ansible-playbook logged-in-user.yaml command

You will find below output , let’s analyse each section.

  • Ansible uses pre-defined modules . Now in example as you can see command is module where we have asked whoami
  • You have possibility to use output of one step as input for other step , as you can see we have registered output in result variable and used in print section as result.stdout
  • You can run this playbook against any host , in that case you need to provide hosts dynamically or by usings hosts file. This example is using localhost for the execution.

The code of this example can be found at github – https://github.com/TheMaheshBiradar/ansible-examples/blob/main/simple-playbooks/logged-in-user.yaml

Conclusion

In Cloud native world where we provision infrastructure on demand, tools like Ansible helps you to create infrastructure using code also considers modularity.

Custom Jax-b bindings for xs:date to JAVA 8 java.time.LocalDate using Adapter

  • Java 8  provides an alternative to the java.util.Date and Calendar classes  in Java SE.
  • Cxf codegen plugin generates  “XMLGregorianCalendar” java type for xs:date schema type and jax-b automtically marshal and unmarshal between XMLGregorianCalendar and xs:date.
  • Java 8 has introduced the java.time package which contains all the classes related to date, time ,date time , time zone . It also takes care of drawbacks of java.util.Date .
1

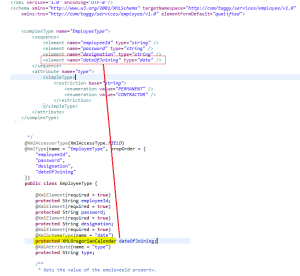
If you generate the classed with xs:date then it would result in to some thing like this.   To generate java.time.LocalDate ,  We can provide mapping via XmlAdapters and custom jax-b bindings. Step 1:  Write custom XmlAdapter as mentioned below.

package com.taggy.adapter;

import java.time.LocalDate;

import javax.xml.bind.annotation.adapters.XmlAdapter;

public class LocalDateAdapter extends XmlAdapter<String, LocalDate>{

	@Override
	public LocalDate unmarshal(String inputDate) throws Exception {
		return LocalDate.parse(inputDate);
	}

	@Override
	public String marshal(LocalDate inputDate) throws Exception {
		return inputDate.toString();
	}

}


Step 2:  Write custom bindings.xml file to override the default jax-b bindings behavior

<?xml version="1.0" encoding="UTF-8" standalone="yes"?>
<jaxb:bindings
  xmlns:jaxb="http://java.sun.com/xml/ns/jaxb" xmlns:xs="http://www.w3.org/2001/XMLSchema"
  xmlns:xjc="http://java.sun.com/xml/ns/jaxb/xjc"
  xmlns:xsi="http://www.w3.org/2001/XMLSchema-instance"
  xmlns:annox="http://annox.dev.java.net"
  xmlns:tns="http://esb.tsf.ab.com/enterprise/message"
  xsi:schemaLocation="http://java.sun.com/xml/ns/jaxb http://java.sun.com/xml/ns/jaxb/bindingschema_2_0.xsd"
  jaxb:extensionBindingPrefixes="xjc annox"
  version="2.1">

  <jaxb:globalBindings>
        <xjc:serializable uid="7702" />
        <xjc:javaType adapter="com.taggy.adapter.LocalDateAdapter" 
            name="java.time.LocalDate" xmlType="xs:date" />
  </jaxb:globalBindings>

</jaxb:bindings>

Step 3 .Configure cxf-codegen plugin to execute custom-bindings file as .

<plugin>
    <groupId>org.apache.cxf</groupId>
    <artifactId>cxf-codegen-plugin</artifactId>
    <version>3.0.2</version>
    <dependencies>
        <dependency>
            <groupId>org.jvnet.jaxb2_commons</groupId>
            <artifactId>jaxb2-basics</artifactId>
            <version>0.6.4</version>
        </dependency>
    </dependencies>
    <executions>
        <execution>
            <id>generate-sources</id>
            <phase>generate-sources</phase>
            <configuration>
                <sourceRoot>${project.build.directory}/generated/cxf</sourceRoot>
                <wsdlOptions>
                    <wsdlOption>
                        <wsdl>${project.build.directory}/com/taggy/services/authentication/1.0/wsdl/employeeservice.wsdl</wsdl>
                    <bindingFiles>
               		 <bindingFile>${project.build.directory}/com/taggy/services/authentication/1.0/wsdl/bindings.xml</bindingFile>
              		</bindingFiles>
              		</wsdlOption>
                </wsdlOptions>
            </configuration>
            <goals>
                <goal>wsdl2java</goal>
            </goals>
        </execution>
    </executions>
</plugin>

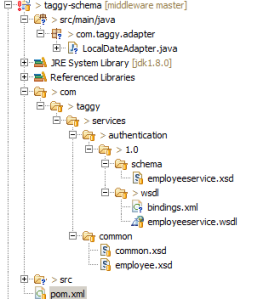
4. Here is entire project structure.

2

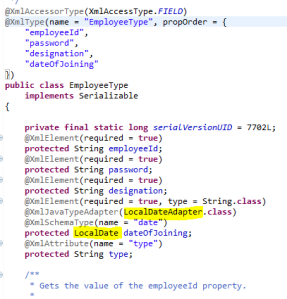
 5. Once you run pom.xml then jax-b classes will be generated and Employee class will be generated as

3

Entire code is available at github code.

Conclusion

To use LocalDate in java web-services provider or consumer we need the wsdl2java transformation and this code helps you to achieve it using jax-b bindings.

You can consider jax-b bindings when ever you need type conversion.

Generate Self Signed Certificate using Java Keytool

It is very important to secure your Java application with an SSL certificate. It is easy to do using Java Keytool. Most of the times you will buy a trusted certificate, but there are many cases when you can generate and use a self signed certificate for free like intranet ,development server.

Never use a self signed certificate on a production server that transfers imporatnt data like account number ,card details

Java Keytool is a key and certificate management utility. It allows users to manage their own public/private key pairs and certificates. It allows more functionality with it’s different set of commands.

Steps to create a Self Signed Certificate using Java Keytool

  • Open the command prompt on system at any folder if JAVA_HOME is set or else  navigate to the directory where keytool.exe is located (usually where the JRE is located, e.g. c:\Program Files\Java\jre6\bin on Windows machines).
  • Run the following command.
    keytool -genkey -keyalg RSA -sigalg SHA1withRSA -validity 730 -alias jbossfuse -keypass password -storepass password -keystore jbossfuse-dev.jks -dname “cn=localhost”
  • This will create a jbossfuse-dev.jks file containing a private key  Now you just need to configure your application server to use the .jks file.

Conclusion

This helps you to deploy and test your apps locally using SSL instead of testing it on managed dev environment .